The Steps to Building a Kitchen Island out of Base Cabinets
 Building a kitchen island out of base cabinets is an excellent way to add valuable storage and counter space to your kitchen. Follow these steps to create your custom kitchen island:
How to Make a Kitchen Island out of Base Cabinets
Gather your supplies, including base cabinets, plywood, paint, hardware, and a saw.
Measure and cut your plywood to fit the dimensions of your cabinets, allowing for a slight overhang on all sides.
Attach the plywood to the top of your cabinets using screws.
Sand the edges and surfaces of the island to ensure a smooth finish.
Paint or stain the island to match your existing kitchen décor.
Attach your chosen hardware, such as drawer pulls or knobs.
Move the island into place and attach it to the floor using L-brackets.
Enjoy your new custom kitchen island made from base cabinets that fit your style and needs perfectly.
Gather Materials and Tools
Building a kitchen island from base cabinets is a great way to add more storage, workspace, and style to your kitchen. Before you start building, it’s important to make sure you have the right materials and tools for the job.
In this section, we’ll go over all of the items you’ll need to create your kitchen island from base cabinets.
List of Necessary Tools and Materials
To build a kitchen island out of base cabinets, you will need the following tools and materials:
Tools:
- Measuring tape
- Pencil
- Circular saw or jigsaw
- Drill with screwdriver bits
- Clamps
- Level
Materials:
- Base cabinets (with matching counter height)
- Countertop material (wood, laminate, granite or other surface options)
- Screws
- Wood glue
- Sandpaper
Using these tools and materials, you can create a customised kitchen island that fits your style and needs while adding more storage and counter space to your kitchen. Pro Tip: Make sure to measure the size of the kitchen properly and choose base cabinets that fit the size and style of your kitchen.
Selecting the Right Cabinets
Selecting the right base cabinets is crucial when building a kitchen island. Here are some factors to consider when making your selection:
Size: Consider the size of your kitchen and the available space for the island. Measure the area and select cabinets that fit comfortably.
Height: Determine the height of the cabinets based on your needs, such as using them for counter seating or food preparation.
Style: Choose cabinets that match the overall style of your kitchen.
Quality: Invest in high-quality cabinets that are sturdy and durable.
Once you have selected the right base cabinets, gather tools and materials such as screws, a level, a drill, and wood glue to assemble and secure the cabinets. The process typically involves removing any drawers or shelves, attaching the cabinets together, and adding finishing touches to create a cohesive, functional kitchen island.
Choosing the Right Countertop
Selecting the right countertop is an important aspect of building a kitchen island out of base cabinets. There are several materials to choose from, each with its own unique features, benefits, and drawbacks.
Here are the most popular countertop materials on the market:
Granite: This is a sturdy and elegant option that can handle high temperatures and resist scratches and chips.
Quartz: This is a durable and hygienic option that can imitate the look of natural stone and is easy to maintain.
Marble: This is a luxurious and timeless option that requires regular maintenance and is prone to scratching and staining.
Butcher block: This is a warm and inviting option that can add a cozy and rustic feel to your kitchen and requires regular oiling to prevent drying and cracking.
Stainless steel: This is a modern and sleek option that can withstand high heat and moisture and is easy to clean and maintain.
Once you have chosen your countertop material, it’s time to gather the necessary materials and tools to build your kitchen island out of base cabinets. Here are the steps:
1. Measure the space and purchase the necessary cabinets for your kitchen island.
2. Purchase a countertop material of your choice and have it cut to the proper dimensions.
3. Gather tools like a drill, screws, nails, hammer, saw, level, and a measuring tape.
4. Assemble the cabinets by following the manufacturer’s instructions and secure them in place.
5. Attach the countertop to the base cabinets and seal the edges to prevent water damage.
Pro tip: Make sure to choose a countertop material that complements your kitchen decor and suits your cooking needs. Also, take the time to gather high-quality materials and tools to ensure a sturdy and long-lasting kitchen island.
Preparing the Space
Before you begin creating your DIY kitchen island out of base cabinets, you must first assess the available space you have in your kitchen.
Take measurements of the area you plan to place the island, as well as the size of the base cabinets you plan to use. This is important for ensuring your island fits properly into the space and that you have the required material to complete the project.
Measuring and Marking the Space
Measuring and marking the space is the first and most important step in building a kitchen island out of base cabinets. Here are the steps to follow:
1. Measure the length and width of the space where you want to place the kitchen island.
2. Purchase base cabinets that fit within the measured space.
3. Arrange the cabinets in the planned island location and measure the total length and width of the cabinets.
4. Mark the measurements on the floor using painter’s tape or a pencil.
5. Verify that the spacing between the marked cabinets is even and in line with your kitchen design.
6. Make any necessary adjustments to the markings to achieve your desired layout.
Pro tip: Consider leaving an overhang on one or more sides of the kitchen island to create additional seating space for bar stools.
Identify and Update Plumbing and Electrical Fixtures
When building a kitchen island out of base cabinets, identifying and updating plumbing and electrical fixtures is a vital step to ensure that the island fits perfectly in your kitchen and functions properly.
Here are the steps to follow:
Identify the location of the nearest water and electrical supply lines to your kitchen.
Determine the placement of your new island in relation to these lines to plan for any necessary updates or rerouting.
Consult with a licensed plumber and electrician to assess any necessary changes or updates.
Have any plumbing or electrical work completed before installing the base cabinets for your new island.
This pre-planning and consultation are crucial to ensure that your kitchen island fits into your space seamlessly and functions with all the necessary utilities.
Determine the Base Frame for the Project
To build a kitchen island out of base cabinets, it is crucial to determine the base frame of the project to ensure stability and durability of the structure.
Follow these steps:
Measure the length and width of the kitchen island space and take note of the measurements.
Choose the base cabinets that will form the structure of the kitchen island, keeping in mind the dimensions and the design that best suits your needs.
Place the cabinets in the designated island space, adjusting their positions until they are aligned and levelled perfectly.
Join the cabinets together using wood screws, brackets, and L-brackets for added strength and stability.
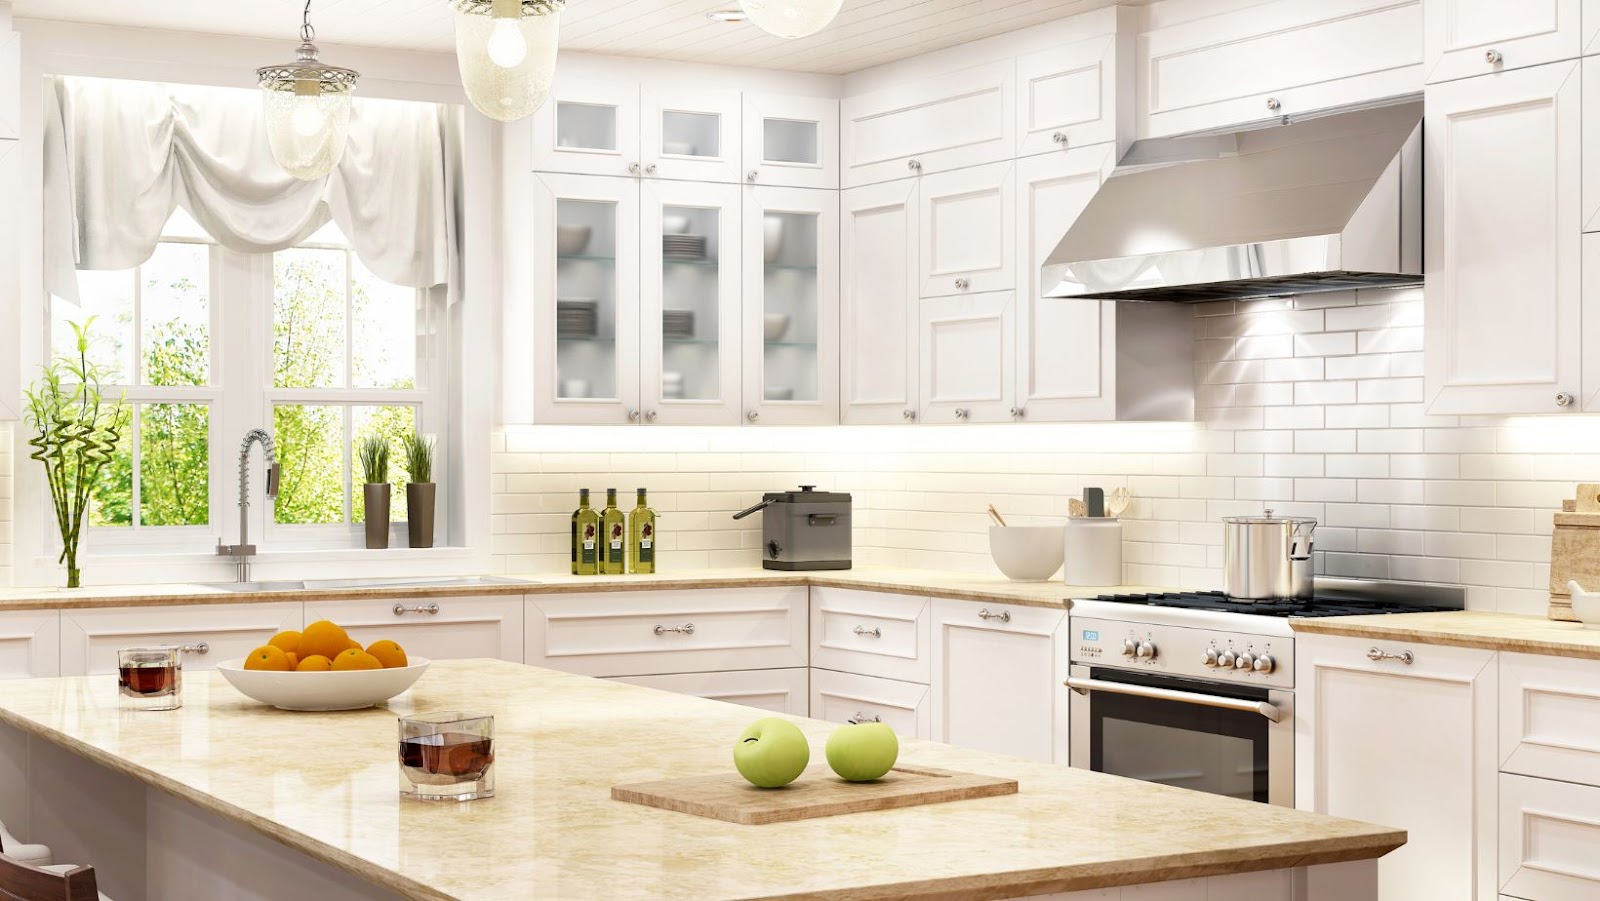
Install a solid countertop (such as granite or marble) or a wooden worktop on the constructed base frame to complete the kitchen island.
With this simple process, you can build a durable and functional kitchen island with base cabinets.
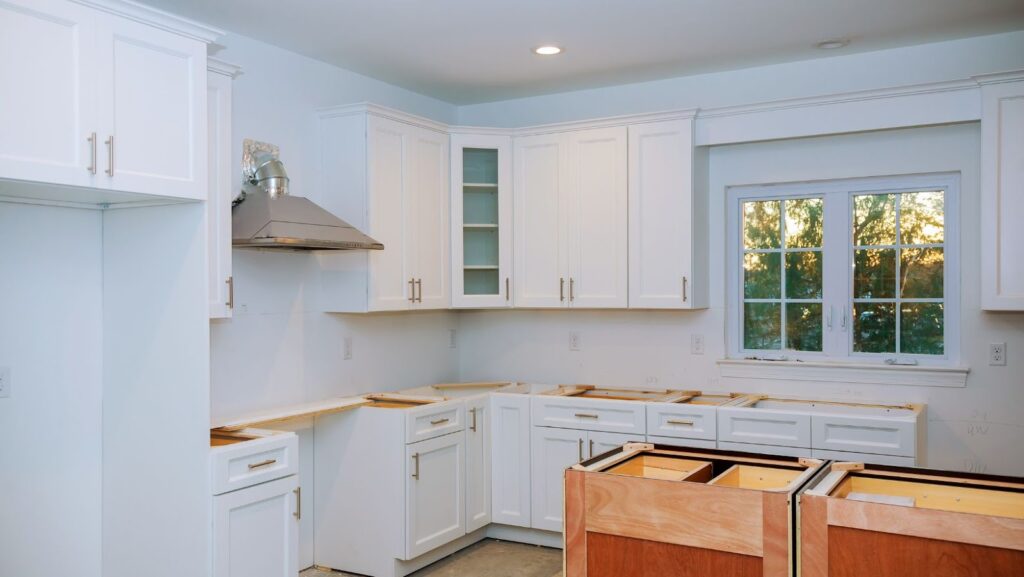
Installation of Base Cabinets
If you are looking to add a kitchen island to your home, installing base cabinets provides a great starting point. This article will guide you through the steps of installing and connecting base cabinets to create a kitchen island. With a few tools and supplies, you can transform any kitchen into your own personal paradise.
Read on to learn how to successfully assemble and install your base cabinets for a custom kitchen island.
Pre Assembling Cabinets
Pre-Assembled kitchen base cabinets is a smart way to make the installation process more efficient and accurate. Here are the steps to build a kitchen island out of base cabinets:
First, measure the space where you want to install the island and choose the base cabinet sizes that will fit best.
Next, lay out the base cabinets in the configuration you desire, ensuring that they are properly aligned and levelled.
Then, preassemble the base cabinets following the manufacturer’s instructions, including attaching any necessary hardware or brackets.

Once the cabinets are pre assembled, it’s time to secure them to the floor and to each other to form a stable base.
Finally, add a countertop, and any finishing or decorative touches to complete the island.
Pro Tip: Pre Assembling cabinets can save time during installation and ensure that everything is level and aligned. Remember to follow the manufacturer’s instructions carefully to avoid any mistakes.
Securing the Base Cabinets Together
When building a kitchen island out of base cabinets, securing the base cabinets together is an essential step to ensure the stability and longevity of your island. Here’s how you can secure your base cabinets together:
First, arrange the base cabinets in the desired position for your kitchen island.
Then, use clamps to hold the cabinets together tightly.
Drill pilot holes through the frames of the cabinets at the locations where they will be secured. Be sure to align the holes in both cabinets.
Attach the cabinets together using screws that are long enough to go through the frames of both cabinets without coming out the other side.
Check for level and adjust if necessary.
Fill any gaps between the cabinets with wood filler and sand smooth.
Now you’re ready to add the countertop and any additional features to your new kitchen island.
Pro tip: Add additional support brackets at the back of the island to further secure the base cabinets.
Securing Cabinets to the Floor and Wall
Securing cabinets to the floor and wall is a vital step in installing base cabinets for building a kitchen island. Here are the steps to follow:
First, ensure that the floor and wall surfaces are level before starting the installation process. Use shims to level the cabinets if needed.
Then, mark the desired height of the cabinets on the wall, and locate the wall studs to secure the cabinets in place. Drill pilot holes through the cabinet back and into the studs using a drill.
To secure the cabinets to the floor, use screws to attach the bottom edges of the cabinets to the floor joists, making sure to avoid pipes and wires.
Repeat the process for each cabinet in the island, ensuring that each cabinet is securely fastened together and level.
Pro Tip: Use a carpenter’s level to ensure that the cabinets are installed accurately and evenly.
Installing Countertop
After you’ve secured the base cabinets to the floor, the next step in creating your kitchen island is to install the countertop. To ensure a sturdy and secure countertop, you’ll need to have the right materials and tools.
This guide will provide a detailed overview of the steps you should follow to properly install a countertop and complete your kitchen island.
Measuring the Countertop
Measuring the countertop accurately is crucial for a successful installation process when building a kitchen island out of base cabinets. Here are a few steps to follow when measuring the countertop:
Use a measuring tape to measure the length and width of the cabinets or the area where the countertop will be installed. If the countertop requires a curve or angle, use a cardboard or paper template to trace the shape onto the countertop material before cutting.
Allow for overhangs that jut out past the cabinets’ front and sides while measuring to accommodate seating and prevent spills.
Ensure there are no obstructions like switches or pipes that will hinder installation.
Make sure to check these measurements twice to avoid any errors or miscalculations before installing the countertop onto your kitchen island.
Cutting and Assembling the Countertop
Building a kitchen island out of base cabinets is a great way to add workspace and storage to your kitchen. Here are the steps to follow for cutting and assembling the countertop:
Measure the length and width of the cabinets and transfer those measurements to the wood countertop.
Use a square and a pencil to mark the cutting lines.
Cut the countertop to size using a circular saw.
Use wood glue to attach the countertop pieces together, making sure to clamp them tightly until the glue dries.
Once the glue is dry, sand down the edges and the surface of the countertop until it’s smooth.
Apply a coat of sealant or paint to protect the wood and give it a finished look.
Finally, place the countertop on top of the base cabinets and secure it with wood screws from below.
Installing the Countertop on the Base Cabinets
Installing the countertop on the base cabinets is the final step in building a kitchen island out of base cabinets. Here are the steps to follow:
1. Choose your countertop material and measure it to fit your base cabinets.
2. Apply a bead of silicone along the top edges of the base cabinets.
3. Carefully place the countertop onto the cabinets, making sure it is level.
4. Use a drill to secure the countertop to the base cabinets using screws (often included with the cabinets) from underneath the base cabinets.
5. Use a putty knife to apply wood filler on the seams where the countertop meets the base cabinets. Let it dry completely.
6. Sand the wood filler down until it’s flush with the countertop and cabinets.
Your kitchen island is now complete and ready to be enjoyed!
Finishing Touches
After you have assembled, installed, and connected all the base cabinets, it is time for the finishing touches. This is the fun part where you get to decorate and customise the island to your tastes and preference.
Here, you can select the countertop, add edging, and finish the island with your choice of paint and other decorative elements. Let’s explore the options available for the finishing touches.
Sanding and Staining the Kitchen Island
Once you have built your kitchen island out of base cabinets, it’s time to add the finishing touches by sanding and staining the wood to make it shine.
Here are the steps to follow:
Sand the wood surfaces with 120-grit sandpaper, followed by 220-grit sandpaper for a smooth finish.
Use a tack cloth or damp cloth to remove any sawdust or debris from the wood.
Apply a wood conditioner to the surface to ensure a more even stain application.
Apply wood stain using a brush, cloth or spray. Be sure to follow the manufacturer’s instructions.
After 5-15 minutes, depending on the desired darkness of the stain, wipe off the excess stain with a cloth.
Let the wood dry for at least 24 hours before applying a top coat of sealant or finish.
Pro tip: To prevent dust and debris from landing on the wet stain, work in a well-ventilated area with low humidity and avoid using a fan.
Installing a Backsplash
Installing a backsplash is a great way to add a finishing touch to your kitchen renovation project. Here are the steps to follow to install a backsplash:
1. Measure the area where you want to install the backsplash.
2. Purchase your desired backsplash materials, such as tiles or peel-and-stick sheets.
3. Clean the area where you will install the backsplash to ensure it’s free of dirt and debris.
4. Apply adhesive or mortar to the backsplash surface.
5. Install the tiles or sheets, pressing them firmly into place.
6. Allow the adhesive or mortar to dry completely.
7. Apply grout to fill the spaces between the tiles or sheets.
8. Use a damp sponge to remove excess grout.
9. Allow the grout to dry.
10. Clean the surface of the backsplash with a damp cloth to remove any grout residue.
A kitchen island is a great addition to any kitchen, and you can use base cabinets to create one. Here are the steps to follow:
1. Measure the area where you want to build the kitchen island.
2. Purchase the base cabinets that will form the foundation of your island.
3. Remove the doors and hardware from the cabinets.
4. Attach the cabinets together using screws and brackets.
5. Add a countertop to the cabinets, securing it in place with adhesive.
6. Install any additional features, such as a sink or extra storage, as needed.
7. Finish the island with paint or stain to match your kitchen décor.
Pro tip: When installing a backsplash, consider using contrasting grout to make your tiles stand out. And when building a kitchen island, make sure to leave enough space around it to allow for easy movement and use.
Installing Lighting Fixtures on the Kitchen Island
Installing lighting fixtures on the kitchen island is a simple and effective way to enhance the look and functionality of your kitchen. Here are the steps to follow to complete this finishing touch after building your kitchen island out of base cabinets:
1. Choose your lighting fixtures- Decide whether you will use pendant lights, chandeliers, or recessed lighting depending on the size and style of your kitchen island.
2. Determine the size- Measure the distance between the bottom of the fixture and the top of the countertop to ensure proper hanging height.
3. Install an electrical box- Consult a professional electrician to install an electrical box on your ceiling.
4. Wire the fixtures- Connect the wiring from the electrical box to each light fixture.
5. Hang the fixtures- Securely attach each fixture to the ceiling, making sure that they are evenly spaced over the kitchen island.
By following these simple steps, your kitchen island will be complete and look stunning.